First, my apologies for my absence. We got a new puppy. Bad excuse, but it's the truth. I'll have a lot of catching up to do to get back on my 50 projects in 365 days plan!
Normally I start out my posts with a rant about why the commercially available product is A) Hazardous B) Unhealthy C) Overpriced D) All of the Above. Crayons, however, are rather wholesome. They are non-toxic, inexpensive, and generally fun for all ages. There are brands with a higher wax-to-pigment ratio (that's fancy talk for they don't write as well), but even the super-cheapo crayons that they give your kid to distract them at chain restaurants aren't all that bad.
The dupe here is that they break. Lots. It doesn't matter if you get the big thick ones, the triangular ones, the ones with the sharpener. They are going to break into a million little pieces that even the smallest hands can't use. It's wasteful, I say!
Have you seen the commercials for the Crayola Crayon Maker? Here it is:
It's all jazz man. Don't get me wrong, I would love to play with one for a couple hours, and I know that the bright colors and shiny national marketing strategy are just what the doctor ordered for a bored kid. Unfortunately, those same cool factors are what's driving the price up to a suggested retail value of $35 plus tax. We can do something ALMOST as cool at home, with stuff you probably already have.
You'll Need:
Compartmental Baking Pan (muffin tin, mini muffin tin, silicon teddy bear candy mold, you name it!)
Crayons that have known better days
Exacto knife or sharp scissors (if your crayons still have paper, optional)
1. Preheat the oven to 200 F while you take all the paper off. I had a lot of crayons that came out of the package broken (grumble grumble) so I used my exacto knife to slice carefully down the crayons long-ways.
2. Break bigger chunks into shorter pieces (small enough to fit into your pan's compartments). Overfill to make sure that your crayons are big enough - the melted wax will fill in all the spaces between your pieces.
3. Group however you want! Some ideas:
- Rainbow Swirls (beautiful, but not too practical to color with)
- Cool/Warm Colors (cool makes beautiful water! stay in the lines)
- Similar Colors (this is what I did, since I had a lot to work with)
- Go the Crayola route and do silly themes. (Brown, pink and white are "neopolitan." Cornflower, Goldenrod and Periwinkle make "bouquet")
4. Melt in the oven for around 20 minutes. Be very careful removing the pan, especially if your compartments are very full or you'll get some unintentional swirlage.
5. Let cool. It takes a long time, especially in rigid (not silicone) pans, but eventually they will pop out if you turn the pan over and deliver a swift hit to each compartment.
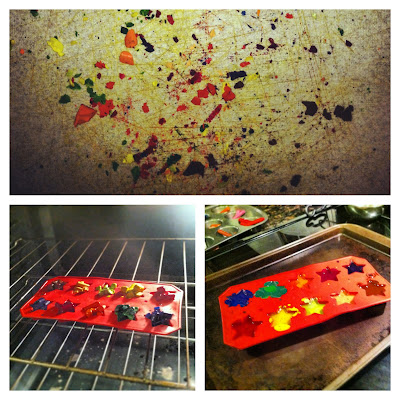
We used a mini muffin tin and grouped similar colors so that my daughter could use her new crayons on her coloring books without accidentally getting green in Dora's hair or orange on Elmo. They turned out great, and she loves them. I will never throw away a broken crayon tip again. Photo time! These are some of my favorites yet:
- Crayon brand name and quality makes little difference when recycling. The only difference? the cheap wax rises and is much paler on paper.
- You don't have to use a flexible silicon pan, but you do have to cool a long time with a metal pan.
- Kids think round crayons are cool
Update: Re-Crayon'd 2.0
Several months ago, I found a cheap ($1, to be precise) ice cube tray at Target. Ice cubes? Nay! Crayons! They turned out even better than the round ones, and were much easier to get out of the pan. Plus my crayons automatically come with 5 perfect points on them now. :-) Happy mommy, happy kiddos.


I will now be saving all crayons as fun craft time with my 7 year old daughter. This crayons look like they are lots more fun with the cool swirly colors. Great idea...thanks Erin!
ReplyDeleteIt's too easy, Christine. I can't believe I've never done it before! Enjoy!
ReplyDeleteAwesome idea. Love it!
ReplyDelete