Showing posts with label Tutorials. Show all posts

Friday, March 23, 2012

The Duped Project 9/50: Re-Crayons


First, my apologies for my absence. We got a new puppy. Bad excuse, but it's the truth. I'll have a lot of catching up to do to get back on my 50 projects in 365 days plan!

Normally I start out my posts with a rant about why the commercially available product is A) Hazardous B) Unhealthy C) Overpriced D) All of the Above. Crayons, however, are rather wholesome. They are non-toxic, inexpensive, and generally fun for all ages. There are brands with a higher wax-to-pigment ratio (that's fancy talk for they don't write as well), but even the super-cheapo crayons that they give your kid to distract them at chain restaurants aren't all that bad.

The dupe here is that they break. Lots. It doesn't matter if you get the big thick ones, the triangular ones, the ones with the sharpener. They are going to break into a million little pieces that even the smallest hands can't use. It's wasteful, I say!

Have you seen the commercials for the Crayola Crayon Maker? Here it is:


It's all jazz man. Don't get me wrong, I would love to play with one for a couple hours, and I know that the bright colors and shiny national marketing strategy are just what the doctor ordered for a bored kid. Unfortunately, those same cool factors are what's driving the price up to a suggested retail value of $35 plus tax. We can do something ALMOST as cool at home, with stuff you probably already have.

You'll Need:
Compartmental Baking Pan (muffin tin, mini muffin tin, silicon teddy bear candy mold, you name it!)
Crayons that have known better days
Exacto knife or sharp scissors (if your crayons still have paper, optional)

1. Preheat the oven to 200 F while you take all the paper off. I had a lot of crayons that came out of the package broken (grumble grumble) so I used my exacto knife to slice carefully down the crayons long-ways.

2. Break bigger chunks into shorter pieces (small enough to fit into your pan's compartments). Overfill to make sure that your crayons are big enough - the melted wax will fill in all the spaces between your pieces.

3. Group however you want! Some ideas:
  • Rainbow Swirls (beautiful, but not too practical to color with)
  • Cool/Warm Colors (cool makes beautiful water! stay in the lines)
  • Similar Colors (this is what I did, since I had a lot to work with)
  • Go the Crayola route and do silly themes. (Brown, pink and white are "neopolitan." Cornflower, Goldenrod and Periwinkle make "bouquet")

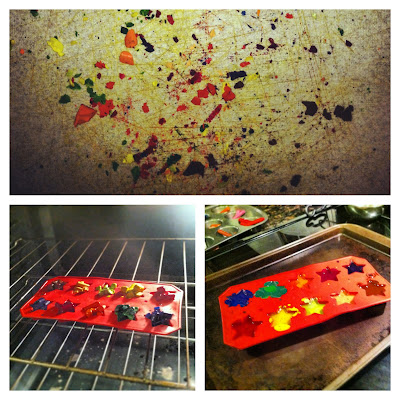
4. Melt in the oven for around 20 minutes. Be very careful removing the pan, especially if your compartments are very full or you'll get some unintentional swirlage.

5. Let cool. It takes a long time, especially in rigid (not silicone) pans, but eventually they will pop out if you turn the pan over and deliver a swift hit to each compartment.

We used a mini muffin tin and grouped similar colors so that my daughter could use her new crayons on her coloring books without accidentally getting green in Dora's hair or orange on Elmo. They turned out great, and she loves them. I will never throw away a broken crayon tip again. Photo time! These are some of my favorites yet:


What I learned:

  • Crayon brand name and quality makes little difference when recycling. The only difference? the cheap wax rises and is much paler on paper.
  • You don't have to use a flexible silicon pan, but you do have to cool a long time with a metal pan.
  • Kids think round crayons are cool

Update: Re-Crayon'd 2.0


Several months ago, I found a cheap ($1, to be precise) ice cube tray at Target. Ice cubes? Nay! Crayons! They turned out even better than the round ones, and were much easier to get out of the pan. Plus my crayons automatically come with 5 perfect points on them now. :-) Happy mommy, happy kiddos.


Friday, January 20, 2012

The Duped Project 2/50: Detergent vs. Soap


Summer


To be perfectly honest, I have no idea what got me started on making my own soap. My family has super sensitive skin, and I love to make a gift for someone that they can actually use. Maybe that was it. Either way, last mothers day, I hit etsy.com looking for a supplier for my newest project: Soap for mom.

First I looked at making soap on my own, but making the base for the soap is complicated, labor intensive, and can release some not-so-great fumes, which presented a problem since I was pregnant at the time.

Then I found Lather and Lotions, with a whole array of "melt-and-pour" soap bases that totally eliminated the need for me to do it myself. I also found some spectacular photography of some artisan-quality soap (I've included some of my favorite shots - soap for every season!). I was convinced. I messaged the shop owner, and Christine responded. It was a great customer service experience. I asked questions and told her what I wanted, and she put together a wonderful array of supplies that would include everything I could need - all for less than $10 per gift.

Autumn
I knew I wanted to talk about soap when I did the duped project, so one of the first things I did was contact Christine again and ask her if she would lend this blog some of her great knowledge. Specifically, I asked her what the dupe is in soap. Here's what she said.

"...Commercial soap is a detergent with the glycerin stripped out. That is why commercial soap is so "bubbly" The melt and pour soap I sell is made out of oils and has a creamier, foamier feel to it. It does bubble nicely but feels much richer. "
Spring
She goes on to explain what makes difference. "When real soap is made the lye reacts with the oils to make glycerin. This process is called Saponification. Glycerin is a humectant, meaning it attracts moisture to your skin (instead of it just being in the soap), that is why so many people feel a big difference in their skin when using handmade soap. The glycerin creates a thin layer on the skin and is absorbing moisture."

Wait, so when I buy commercial soap, I'm not getting soap at all? I'm getting detergent that has the moisturizing part stripped out of it? No wonder I need lotion.

Winter
And don't just take her word for it. Take mine (after all, you are reading my blog). Last month, I finally replaced my bar soap in the shower (in the middle of winter, when my skin is usually cracking-dry) and not only does it feel better, it makes my skin feel completely different.

Unfortunately, I ran out of soap. Perfect timing! Now I can show you how easy it is. After the jump, of course.

Monday, January 16, 2012

Upcycled Twirlers


Upcycling! It's a buzz word. At least it is in my head. And now that it's such a big deal to me, I think twice before I throw anything away. For example, a few weeks ago, I had to buy my 2 year old some bandaids, and of course she had to have the Disney Princess ones. It occured to me as I checked out that she had no idea what was inside the box, and just liked the box itself. And who says that's a bad thing?

How many times have you heard a mom say, "I don't know why we buy them expensive toys, because they just want to play with the box!" I say, let them play. Here's how I used the princesses from our band-aid box. These "Twirlers" are so easy to make, you can probably do the craft with your child!

You can do this with anything that is made of paperboard. So many products are printed with our kids favorite characters, and this could be so fun! Bandaids, cereal, yogurt packaging, etc. I think we'll start a collection of "twirlers."


You need:
  • Paperboard cut-outs of something awesome (no bigger than a few inches wide/tall)
  • Colorful plastic straws
  • Transparent tape
  • Clear contact paper/laminating sheets (optional)
  • Scissors (pointy sharp ones)


The steps are so simple, it's hardly worth writing down, but since I didn't take pictures, here I go:

1. Cut out around the character. 
2. Sandwich the cut out in contact paper/lamination
3. Cut out the lamination, leaving 1/4-1/2" of lamination around the edge
4. Cut 2 1"slits down one end of the straw, directly across from each other, like so:

Cut on dotted lines

5. Slide character into slits and secure on both sides with tape
6. SPIN! (See diagram below)

My sweet girl loved this. We call ours "dancing princess twirl wands" (what a mouthful!). I got some great shots of her, then accidentally deleted them (doh!) but these will do. She's still playing with them 2 days later, which outlived many things Santa brought. Don't chuck the box, mom! If you make these, please let me know! farbeyonddesigns@gmail.com. Thanks!


Friday, January 13, 2012

The Duped Project 1/50: Homemade Cornbread


What's the hurry? Well, when dinner's gotta be on in 30, there's always a reason to make things happen fast and easy. In a Jiffy, you might say. Hardy har har. Yeah, sorry about that one. It's a curse.

I grew up with Jiffy in my grandma's kitchen - and the printing on the box is exactly the same as 20 years ago, as far as I can tell. So what's so fast about Jiffy? And what's actually in the magical blue box? 

Well, as it turns out, the stuff that's inside is actually rather wholesome. In fact, it's pretty much exactly what's in cornbread if you make it from scratch, minus the "wet" ingredients (egg, milk and butter) with two crucial exceptions: there are a few preservatives, and it contains animal fat (lard) and/or hydrogenated solids (so that you don't have to have butter on hand when you bake it). Yuck-o. Thank you, but my veins are happier without those trans fats. Let's see what we can do about that.

My dear husband went through a stage a while back when he had some spare time (long since a memory now) of cooking from scratch. There are several "legacy items" in our pantry left over from those spur of the moment trips to the supermarket, including 4 kinds of cornmeal. I'm not kidding. I guess he just kept forgetting he had already bought it. Anyway, this kind was "course ground," which just sounds yummy. And conveniently there was a recipe for cornbread on the back. Game on. (after the jump!)


Tuesday, November 22, 2011

Star Wreath Tutorial


It's been a while since I have done a tutorial, so I'm going all out on this one. Just in time for the holidays, make this beautiful wreath with just a few cheap supplies!

Make me!
You'll need:
Card Stock (I used double-sided 12x12 inch scrapbooking card stock, but as long as it's thick, it'll work)
Printer paper
Cardboard (at least 12 inches square)
Printer (or a steady hand and a good eye for stars)
Glue (even Elmer's should work, but I use fabric glue here)
Exacto knife
Ruler
Tape
3-4 inch Star Template (see below)
Ribbon
Buttons (optional)

I originally got this idea, in it's entirety, from Little Birdie Secrets, so mad props to those folks. I take no credit for the genius, but simply wish to pass on my version, which uses less-expensive (or at least easier to find) methods. Basically, I didn't have a hot glue gun, bone folder, scoring template, or die-cutting machine. But I carried on! Here's the steps:


Tuesday, July 12, 2011

Quilted Wall Hanging for Nursery

Finished Wall Hanging in the Nursery
Although this project will not be for sale on Far Beyond, I wanted to include a step by step documentation of the process. If the quilted wall hanging is something that customers want, I would be able to print my art on fabric and put it as the center panel, much like the big heart in this piece. Sorry the photo quality is so bad - I was too lazy to pull out the real camera, and resorted to using my phone.

I have a super-cute sheet set for my 2 year old in all kinds of funky heart and stripe prints. It came with 3 pillow cases, and after just a couple washes, one of them got a small tear from the machine (I said cute, not high quality). I could have stitched it up, but since I really didn't need all three of the pillow cases, I stashed it away in the scrap pile along with the coordinating bed skirt that doesn't work on my daughter's bunk beds.

When I found out baby 2 was a girl, I knew for sure that I wanted the girls to share a room when they were old enough, so I decided to re-use the baby linens from my first daughter with a new twist. When they combine rooms, their decor will match, and in the meantime I saved a pretty penny on crib sheets. For the twist, I dove in the scrap pile and found the pillowcase and bed skirt.

I started by turning the bed skirt into a very simple valance with some $1 ribbon and a $3 curtain rod I got at Walmart (why oh why do they have to be so temptingly cheap?). I also recovered an IKEA pillow in the same fabric for the rocking chair and added that to a pillow I already had from the old nursery bedding.

Pillows & Valance
After the paint, bedding and furniture came together, I saw an opportunity for something to hang over the crib. At first I hung a large framed print. What was I thinking? Baby will pull that down on herself in a hot minute. Something fabric this way comes...

Quilts have a rich heritage in American culture, and also in my own history. My grandmother, God rest her sweet soul, was my teacher in all things sewing. Every time I pull out the sewing machine, or even just a needle and thread, I hear her advice. Some of our favorite projects were quilts. Starting with simple quilts where my contribution was only to cut the squares that had been marked by Grandma, all the way up to my last quilt that I completed on her old sewing machine: a bed cover for my first dorm room.

Years later, when she passed, my grandfather mailed me a quilt that she had made after I had left home and gotten married. The note from Grandpa said that she made the quilt for my first baby. Though Grandma was gone before my first child was born, I treasure the pictures of my daughter, only two weeks old, smiling on a backdrop of fabric swatches, cut loving for her by her great-grandmother.

Great-Grandma's Quilt
Looking at my coordinating fabric scraps and thinking about how, to me, a quilt is the perfect way to welcome a new baby, I pulled out the paper and pencil. I wanted something small, with ribbon loops on the top to hang it from a matching curtain rod like it's predecessor, the valance. I took inventory, chopped up the 3 different fabrics that made up the pillow case and based all my measurements on the size of the big heart and the width of the smallest scraps. The heart was 15 inches square and the scraps were 7 inches at their narrowest point. To make my plan work, all the surrounding smaller squares would be 5 inches, making the math simple.

Check out the the photos after the jump to see the steps I took: from an old pillowcase and bed skirt to what I hope to be a treasure for my newest daughter. Thanks for reading!